Saturday, March 9, 2019

DIY Lip Scrub

Hello, welcome back! Today we will be making a vanilla lip scrub. You will need:

  • 2 tbs sugar
  • 1 tsp coconut oil
  • 1/4 tsp vanilla extract

Mix all of your ingredients together in a small container.


And that's it, simple as that. This is how mine turned out:


This one-step DIY was super easy to make. It's a great exfoliator, and the vanilla tastes amazing on the lips. I hope you try this one!

Until next week,

-Vasti

DIY Dippin Dots

Hello! Today we're making DIY Dippin' Dots with yogurt. You will need:

  • yogurt of your choice (you can also use ice cream)
  • plastic resealable bag
  • parchment paper
  • scissors

Put your yogurt into the bag and cut the tip off.


Lay parchment paper over a plate and squeeze out small dots of yogurt.


Put the plate in the freezer, and freeze for 20-30 minutes. After that, you're done! This is how mine turned out:


This DIY was super quick and easy to make. It's a nice, healthy snack for when you want a quick treat. I hope you try these out!

Until next week,

-Vasti

Sunday, March 3, 2019

DIY Dryer Balls

Hello! Today we're making dryer balls. These are a great replacement for dryer sheets. You will need:

  • yarn
  • white vinegar
  • essential oils
  • nylon tights
  • scissors

First, cut a 6-foot long piece of yarn.


Then, keep folding the string in half until you get a two-inch long piece. Then use the ends of the string to tie a knot in the middle.


Then, use one of the ends of the string to tie the bunch of yarn onto the big ball of yarn. 


After that, keep wrapping the yarn around itself until you have a 4-inch wide ball of yarn.


 Then, cut off the leg of the nylons, making sure the toe part is intact.


Put the ball into the nylons. Secure it tightly with a knot. Do this with all of your balls of yarn, making a chain with however many dryer balls you would like.


Put the balls into the washer and dryer with any load of laundry. While the laundry is being done, mix the oil and vinegar together. 


Once the laundry load is finished, take the balls out of the nylons and dip into the liquid. Don't oversoak these, or else you'll have a very potent laundry load!


Let them dry, and you're done. This is how my dryer balls turned out:


This DIY was pretty straightforward, but it was a bit time-consuming. I definitely recommend doing this project on a relaxed weekend and have a few hours to spare. They're a great waste-free alternative to conventional dryer sheets, and I love how you can put your own scent onto your clothes! I hope you try this one out.

Until next week,

-Vasti


Wednesday, February 27, 2019

DIY Hair Ties

Hello! Today we're making a very easy DIY: hair ties out of nylon tights. You will need:

  • nylons or any tights in the color of your choice
  • scissors

First, cut out the toe part of the tights. Then cut thin strips going across. Stretch them out, and you're done! This is how mine turned out:


This DIY is great for when you're in a pinch and need a hair tie. It's also great to make these hair ties to repurpose those tights that have a hole. I hope you try this one!

Until next week,

-Vasti


Sunday, February 24, 2019

DIY Bath Play-Dough

Hello, welcome back! Today we're going to be making a DIY version of Lush's fun soap. It works just like play-dough, except it is soap so it melts in water. You will need:

  • 3 tbs corn starch
  • 1 tbs shower gel
  • 1 tbs oil (I used bio oil, you can also use baby oil or any other carrier oil)
  • 1-2 drops of food coloring
  • optional: essential oils

Mix all of the ingredients together until the mixture forms a dough.


Knead the dough until everything comes together, and that's it! This is how mine turned out:


This DIY was super easy to make. It dissolves completely in water, and is great for the bath! I hope you try this out.

Until next week,

-Vasti

Sunday, February 17, 2019

DIY Snickerdoodle Latte

Hello! Today we're making a snickerdoodle latte. You will need:

  • 1 1/2 cups of hot milk
  • 2 tablespoons of light brown sugar
  • 1/4 teaspoon of ground cinnamon
  • 1/2 cup of espresso or strong brewed coffee

Add together all of the ingredients to a cup or jar with a lid. Then shake the jar for a minute to mix everything together.


And you're done! This is how my latte turned out:


This recipe was very quick and easy to make, and it's perfect for an on-the-go morning! I hope you try this one out. 

Until next week,

-Vasti

Sunday, February 10, 2019

DIY Stuffed Bookmarks


Hello! Today we're making DIY clear bookmarks with small decorations on the inside! You will need:

  • resealable plastic bag
  • scissors
  • parchment paper
  • iron
  • glitter, beads, or tiny pieces of paper
  • ribbon
  • toothpick
I forgot to take a photo of the materials, but you'll see them later in the pictures. Start off by cutting your plastic bag into 2 bookmark-sized rectangles.


Next, cut out a rectangle of parchment paper and fold it in half lengthwise. Sandwich the rectangles of plastic in between the paper. After that, iron three sides of the plastic together, leaving one of the short sides open.


Then, fill the bag with glitter, beads, paper, or whatever you want inside your bookmark.


Then seal the top of the bag with the parchment paper and iron. After that, use a toothpick to poke a small hole at the top of your bookmark.


After that, loop some ribbon through the hole and tie a knot at the end.


And you're done! This is how mine turned out:


This DIY was so easy to make. I love the versatility of this project, as you can put anything you want inside the plastic. I hope you try this one out!

Until next week,

-Vasti


Sunday, February 3, 2019

DIY Iced White Chocolate Raspberry Latte

Hey everyone! Welcome back! Today we're making a copycat Starbucks iced white chocolate raspberry latte. You will need:

  • 1 tablespoon of white chocolate sauce
  • 1 tablespoon of raspberry syrup
  • 2 tablespoons of cold coffee 
  • 1 cup of milk
  • ice


  • Pour all of the ingredients into a glass.


    Mix well, and you're done! This is how mine turned out:


    This DIY was so easy to make. It's a super quick recipe if you're ever on the go and don't have time to make a stop at Starbucks. I hope you try this out!

    Until next week,

    -Vasti

    Sunday, January 27, 2019

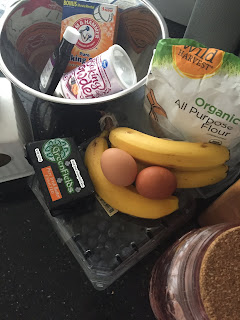
    DIY Banana Blueberry Muffins

    Hello! Today we're making DIY banana blueberry muffins! You will need:
    • 1 ½ cups of flour
    • 1 teaspoon baking powder
    • ½ teaspoon baking soda
    • ½ teaspoon cinnamon
    • ¼ teaspoon salt
    • ¼ cup unsalted butter, melted
    • 3 bananas
    • ⅓ cup sugar
    • 2 large eggs
    • 1 teaspoon vanilla extract
    • 1 cup blueberries

    First, preheat the oven to 350ยบ F. Add to a large bowl the flour, baking powder, baking soda, cinnamon, and salt. Mix well.


    Mash your bananas.


    Melt the butter in the microwave and add in the bananas.


     Then add in the sugar. Mix well.


    After that, add in the eggs and vanilla. Make sure the mixture is well combined.


    Add the wet ingredients into the dry and combine, making sure not to overmix.


    Then fold in the blueberries. 


    Put cupcake liners in your muffin tin and put a tablespoon of mixture into the molds.


    Bake for 35 minutes, and you're done! These are how my muffins turned out:


    This recipe was really easy to make, and the muffins taste really good! I hope you try this out.

    Until next week,

    -Vasti

    Sunday, January 20, 2019

    DIY Hair Mask

    Hello! Today we're making a DIY hair mask for oily hair using only three ingredients! You will need:

    • 1/4 cup of apple cider vinegar
    • 1 tablespoon of honey
    • juice of one lemon/lime

    Add all of the ingredients in a bowl. Mix well.


    After that, you're done! Apply this to your hair in small sections, from roots to ends. Then cover with a shower cap and leave on for 30 minutes. 


    This DIY is perfect for a night in, or a pampering session. It really works! I hope you try this one out.

    Until next week,

    -Vasti

    Sunday, January 13, 2019

    DIY Buttons

    Hello everyone! Today we're going to make buttons using straws! You will need:

    • plastic straws
    • parchment paper (optional)
    • scissors
    • iron
    • needle or safety pin


     First, place some parchment paper on your iron. Then cut 3-inch pieces of your straws.


    Then press the straw onto the iron. I ended up taking the parchment paper off because it kept sliding off. 


    Press the straw onto the iron until you get small pucks of plastic:


    Let everything harden, and heat your safety pin on an open flame. Then with the hot safety pin, poke 2 holes through your plastic. 


    Let everything harden, and you're done! This is how mine turned out:


    These DIY buttons are so easy to make. They work great in a pinch if one of your shirt buttons fall off. I like the imperfect shapes of the buttons! I hope you try these out.

    Until next week,

    -Vasti