Saturday, July 25, 2015

DIY Shrinky Dinks

Hi! Today I'm going to show you how to make your own shrinky dinks. Let's get into it:

You will need:

  • Permanent markers 
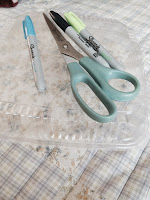
  • #6 plastic (in every plastic container there is a little triangle in the corner or bottom. In the triangle there is a number. in this post you have to use a container that has the number 6 in it.)
  • Scissors


The first thing to do is to cut out your plastic. I cut the box in a square shape. Then with your permanent markers, draw anything you want on your plastic.


Then cut out the shapes.


After that, preheat your oven or toaster oven to 350° F. Put your plastic pieces on wax or parchment paper, and stick them in the oven.


Then, just keep a close eye on them. Mine took about 5 seconds to shrink, but it depends on the oven. Also, you don't want to burn them! If yours curl up, don't worry. The plastic will flatten out. You know when they're done when they curl up and flatten out. After shrinking, this is how mine turned out:


This DIY was so fun to make, and was so much easier than I expected! I never thought that I could make my own shrink film at home, so it was really cool! I loved how the plastic shrunk so much and made the designs really cute. I hope you try this out!
Until next week,
-Vasti
Friday, July 10, 2015

DIY Fruit Popsicles

Hi! Today we are going to make fruit popsicles! Let's get started. You will need:

  • Popsicle mold: if you don't have a mold, you can just use a small cup and a popsicle stick.
  • Any type of fruit: I had frozen blueberries, apples, and plums.
  • Any type of liquid: I used lemonade, grapefruit soda, grape tea, and blackberry juice.


The first thing to do is add the fruit. 


Then, add the liquid of your choice.


After that, insert the top part of the mold, and put it in the freezer.


And that's it! Here is how one of them turned out:


This DIY was so easy to make. It took 5 minutes to make, and is so fun to do outside! I hope you do this DIY!

Until next week,
-Vasti

DIY Rolled Paper Pencil Holder

Hello, today we are going to make a pencil holder out or rolled paper. You will need:


  • Magazine or newspaper
  • Skewer
  • Glue stick
  • Tin can or container
  • Glue gun
  • Scissors


First, you want to make the rolled paper. I used a magazine, so I cut in in half. Essentially, you want to make 4-inch pieces.


Then, this is going to sound confusing, but hopefully the picture below makes sense. Take the skewer, and put it at the edge of the paper. then, roll the paper up, making sure the paper doesn't get too loose.


When it is rolled and you have make several rolls, they should look like this:


After you make a lot of rolls, you get the hang of it and it becomes easy. The next thing to do is to get your hot glue gun out. Once it is hot, get your container or tin can out and start gluing. 


Once you have glued the paper to the can, cut the excess paper off with scissors. This is a bad picture, but this is how it looks when I was done:


This DIY was really fun, and rolling the paper was really addictive! It took a lot of glue and made my hands really gross and sticky, but it was cool. This makes a really good pencil holder, or a container for anything else. If you have any questions, comment below. I hope you enjoyed this post!
Until next week,
-Vasti

Sunday, July 5, 2015

DIY Glasses

I hope you had a great 4th of July! Today I will show you how to make your own glasses from bottles! Let's get started:

You will need:

  • Bottle
  • Alcohol or Nail Polish Remover
  • String or Yarn
  • Fire source (I used my stove)
  • Bowl with ice cold water
  • Sandpaper


The first thing I did was gather all of my materials. Then I wrapped the yarn around the bottle 4-5 times where I wanted the bottle cut, and cut the yarn with the scissors. After that, I tied it in a knot.


Then, I took the yarn off the bottle and soaked it in some nail polish remover.


Then I put the yarn back on.


After that, I set a bowl of ice cold water out.


Then I turned on the heat source, which in my case was my stove.


I set the ice cold water next to me, just in case there was more fire than necessary. Here comes the dangerous step: I recommend parents to do this, or at least parent supervision. I used the stove for the string to catch on fire. When it was on fire, I turned the bottle around and around, and didn't stop until the fire went out so the string could burn evenly. When the fire was out, I quickly plunged it in the ice cold water, and to my surprise, broke cleanly! 


As you might see, the glass wasn't even. Nothing a little sandpaper can't fix! So, for the last step, I took the glass outside and used sandpaper to make it even and smooth.


And that's it! This DIY was a bit more dangerous than the rest, but really fun and worth it to see the bottle break in the water. I hope you try it out, and be careful! Here I am posing for a terrible selfie with my new glass:


Until next time,
-Vasti